
| 일 | 월 | 화 | 수 | 목 | 금 | 토 |
|---|---|---|---|---|---|---|
| 1 | 2 | 3 | 4 | 5 | 6 | 7 |
| 8 | 9 | 10 | 11 | 12 | 13 | 14 |
| 15 | 16 | 17 | 18 | 19 | 20 | 21 |
| 22 | 23 | 24 | 25 | 26 | 27 | 28 |
- reflection
- iterable
- db
- 가비지 컬렉션
- 백엔드
- Locking Read
- 데이터 타입
- 스프링
- MVCC
- 동시성 문제
- Atomic Type
- 가비지 컬렉터
- 동시성
- CAS
- foreach
- Lock
- java
- Varchar
- text
- MySQL
- jpa
- iterator
- 자바
- gc
- Di
- Synchronized
- Today
- Total
과정을 즐기자
자바 쓰레드 관리의 발전 본문
이전 글에서 자바 쓰레드 관리의 시작에 대해 알아보았습니다.
자바 쓰레드 관리의 시작
OS 쓰레드와 유저 쓰레드 자바 쓰레드 관리에 대해 알아보기 전에 OS 쓰레드와 유저 쓰레드에 대해 먼저 알아보겠습니다. OS 쓰레드는 OS 커널 레벨에서 생성되고 관리되는 쓰레드로 CPU 에서 실제
320hwany.tistory.com
자바는 멀티 쓰레드를 이용해 동시성 프로그래밍을 가능하게 했습니다.
하지만 Thread, Runnable은 매번 쓰레드의 생성과 종료를 직접해야 하며 쓰레드 관리가 어려웠습니다.
또한 쓰레드를 실행만 할 수 있을 뿐 결과 값을 반환할 수는 없었습니다.
Callable, Future의 등장
자바가 발전하면서 Callable, Future가 등장했습니다.
@FunctionalInterface
public interface Callable<V> {
    /**
     * Computes a result, or throws an exception if unable to do so.
     *
     * @return computed result
     * @throws Exception if unable to compute a result
     */
    V call() throws Exception;
}
Callable은 함수형 인터페이스로 제네릭을 반환하는 call() 메소드를 가지고 있고 Exception을 발생시킬 수 있습니다.
Callable은 제네릭을 사용하여 결과 값을 받을 수 있습니다.
public interface Future<V> {

    boolean cancel(boolean mayInterruptIfRunning);

    boolean isCancelled();

    boolean isDone();

    V get() throws InterruptedException, ExecutionException;

    V get(long timeout, TimeUnit unit)
        throws InterruptedException, ExecutionException, TimeoutException;
}
Future는 비동기적 연산의 처리 결과를 표현하기 위해 사용됩니다.
비동기 처리가 완료되었는지 확인하고 처리 완료를 기다리고 처리 결과를 반환하는 메소드를 제공합니다.
여기서 비동기 != 멀티쓰레드이며 싱글 쓰레드인지 멀티 쓰레드인지는 비동기와는 관련 없는 개념입니다.
어떤 쓰레드가 작업을 요청하고 그 결과까지 그 요청 쓰레드가 챙겨야 할 때를 동기라고 하고
어떤 쓰레드가 작업을 요청하고 그 결과는 그 요청 쓰레드가 챙기지 않고 다른 쓰레드가 noti를 주거나 callback으로 처리하는 것을
비동기라고 합니다.
즉 Future는 쓰레드들이 비동기 작업을 할 때 그 결과 값들을 얻을 수 있도록 해주는 것입니다.
@Test
void test4() throws ExecutionException, InterruptedException {
    // given
    ExecutorService executorService = Executors.newSingleThreadExecutor();

    Callable<String> callable = () -> {
        Thread.sleep(3000);
        return "Thread : " + Thread.currentThread().getName();
    };

    // when
    Future<String> future = executorService.submit(callable);

    // then
    System.out.println(future.isDone());
    System.out.println(future.get());
    System.out.println(future.isDone());

    executorService.shutdown();
}
여기서 등장하는 Executors, ExecutorService는 쓰레드 풀을 생성하기 위한 것으로 뒤에서 설명하겠습니다.
지금은 그냥 이미 있는 쓰레드를 실행한다 정도로만 생각하고 넘어가겠습니다.
Callable은 위에서 말한 것처럼 결과 값을 반환할 수 있는 함수형 인터페이스입니다.
다음으로 Future를 반환하는데 Future는 비동기 작업을 요청할 때 그 결과 값을 받을 수 있도록 해준다고 했습니다.
위 테스트 결과는 아래와 같습니다.
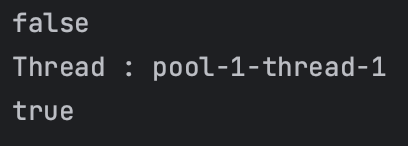
첫 번째 false가 나올 때 Future는 아직 결과 값을 반환받지 못했기 때문에 isDone() 메소드의 결과가 false 입니다.
future의 get() 메소드를 실행하면 결과 값을 받아올 수 있고 다시 isDone() 메소드를 실행하면 결과가 true 입니다.
이때 get() 메소드는 결과를 기다리는 Blocking 요청입니다.
쓰레드 풀
쓰레드의 생성과 관리를 위한 쓰레드 풀의 개념도 추가되었습니다.
매번 요청시 마다 쓰레드를 생성하고 종료하는 것은 매우 비효율적입니다.
따라서 여러 쓰레드를 미리 만들어두고 쓰레드 풀 안에 넣고 필요할 때마다 할당받아 사용하고 사용 후 다시
쓰레드 풀에 반환하는 방식입니다.
Executors
직접 쓰레드를 다루지 않고 편리하게 해주는 팩토리 클래스인 Executors가 등장했습니다.
Executors는 static 메소드로 다양한 형태의 쓰레드 풀을 제공합니다.
newFixedThreadPool, newSingleThreadExecutor 등의 메소드를 이용해 쓰레드 풀을 생성할 수 있습니다.
Executor
Executor 인터페이스는 등록된 작업을 실행하는 역할을 합니다.
단순히 전달 받은 Runnable을 실행하면 됩니다.
public interface Executor {

    /**
     * Executes the given command at some time in the future.  The command
     * may execute in a new thread, in a pooled thread, or in the calling
     * thread, at the discretion of the {@code Executor} implementation.
     *
     * @param command the runnable task
     * @throws RejectedExecutionException if this task cannot be
     * accepted for execution
     * @throws NullPointerException if command is null
     */
    void execute(Runnable command);
}
public class CustomExecutor implements Executor {

    @Override
    public void execute(final Runnable command) {
        new Thread(command).start();
    }
}
위와 같이 Executor를 구현한 CustomExecutor를 만들었습니다.
@Test
void test5() {
    // given
    Runnable runnable =
    		() -> System.out.println("Thread : " + Thread.currentThread().getName());

    // when
    Executor executor = new CustomExecutor();

    // then
    System.out.println("Thread: " + Thread.currentThread().getName());
    executor.execute(runnable);
}
ExecutorService
쓰레드 풀은 기본적으로 ExecutorService를 구현합니다.
Executor가 작업을 실행하는 역할을 했다면 ExecutorService는 ExecutorService는 Executor 인터페이스를 상속받으며
작업 등록, 작업 실행 역할 모두 가집니다.
요청이 들어오면 쓰레드를 새로 생성하는 것이 아니라 쓰레드 풀에서 할당받아 사용하고 사용 후 다시 쓰레드 풀로 반환합니다.
요청이 너무 많아지면 쓰레드 풀에 있는 쓰레드를 할당할 수 없는 상황이면 요청을 Blocking Queue에 넣고 쓰레드를 할당
받을 수 있는 상태가 되면 쓰레드를 할당 받습니다.
@Test
void test6() throws InterruptedException {
// given
ExecutorService executorService = Executors.newFixedThreadPool(5);
Runnable runnable = () -> {
System.out.println("Thread: " + Thread.currentThread().getName());
try {
Thread.sleep(1000);
} catch (InterruptedException e) {
throw new RuntimeException(e);
}
};
// when
for (int i = 0; i < 10; i++) {
executorService.execute(runnable);
}
executorService.awaitTermination(5000, TimeUnit.MILLISECONDS);
executorService.shutdown();
// then
assertThatThrownBy(() -> executorService.execute(runnable))
.isInstanceOf(RejectedExecutionException.class);
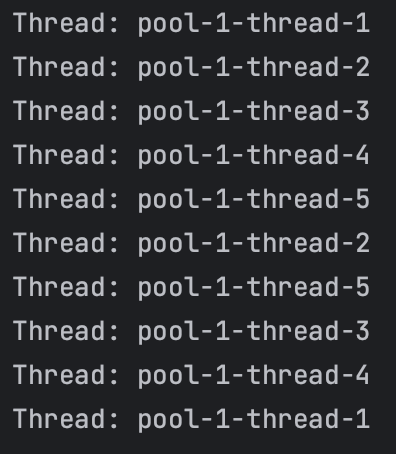
}Executors.newFixedThreadPool(5)은 쓰레드 풀에 5개의 쓰레드를 미리 생성합니다.
이때 newFixedThreadPool 메소드에 들어가보면 Blocking Queue에 얼마 만큼을 할당했는 지 확인할 수 있습니다.
public static ExecutorService newFixedThreadPool(int nThreads) {
    return new ThreadPoolExecutor(nThreads, nThreads,
                                  0L, TimeUnit.MILLISECONDS,
                                  new LinkedBlockingQueue<Runnable>());
}
public LinkedBlockingQueue() {
this(Integer.MAX_VALUE);
}위와 같이 Blocking Queue 의 크기는 무한이므로 요청이 엄청나게 많아지면 Blocking Queue에 계속 쌓이게 되어
메모리가 감당하지 못하면 서버가 다운될 수 있습니다.
다음으로 execute(runnable)로 같은 작업을 10번 실행합니다.
이때 5개의 쓰레드만 동시에 실행할 수 있고 나머지 5개의 작업은 Blocking Queue 에서 쓰레드 할당을 기다립니다.

다시 쓰레드 풀에 쓰레드가 반환되면 Blocking Queue에서 차례로 꺼내 쓰레드를 할당해줍니다.
이제 작업을 완료 했으면 shutdown을 호출해 더이상 새로운 작업을 받아들이지 않도록 합니다.
다음으로 ExecutorService는 비동기 작업의 진행을 추적할 수 있도록 Future를 반환할 수 있습니다.
@Test
void test7() throws ExecutionException, InterruptedException {
    // given
    ExecutorService executorService = Executors.newFixedThreadPool(5);

    Callable<String> hello1 = () -> "Hello1";
    Callable<String> hello2 = () -> "Hello2";
    Callable<String> hello3 = () -> "Hello3";
    Callable<String> hello4 = () -> "Hello4";
    Callable<String> hello5 = () -> "Hello5";
    Callable<String> hello6 = () -> "Hello6";
    Callable<String> hello7 = () -> "Hello7";
    Callable<String> hello8 = () -> "Hello8";
    Callable<String> hello9 = () -> "Hello9";
    Callable<String> hello10 = () -> "Hello10";

    // when
    List<Future<String>> futures =
            executorService.invokeAll(
                    Arrays.asList(
                            hello1, hello2, hello3, hello4, hello5,
                            hello6, hello7, hello8, hello9, hello10)
            );

    for (Future<String> future : futures) {
        System.out.println(future.get());
    }

    executorService.shutdown();
}
위와 같이 invokeAll() 메소드는 동시에 주어진 작업들을 모두 실행하고 전부 끝나면 각각의 상태를 갖는 List<Future>를
반환합니다. 이외에도 Future를 반환하는 submit() 메소드, 가장 빨리 완료된 결과를 반환하는 invokeAny() 메소드가 있습니다.
정리
이전 글에서 멀티 쓰레드 동시성 프로그래밍을 위해 자바 초기에 나온 Thread, Runnable에 대해 알아봤습니다.
Thread, Runnable은 쓰레드의 생성, 종료를 직접해야 하며 관리가 어렵고 값을 반환할 수 없다는 단점이 있었습니다.
Collable과 Future의 등장으로 값을 반환할 수 있었고 쓰레드 관리는 쓰레드 풀 개념이 나오면서 훨씬 효율적으로
관리할 수 있게 되었습니다.
Future는 쓰레드들이 비동기 작업을 할 때 그 결과 값들을 얻을 수 있도록 해주었지만 결과를 얻으려면 Blocking 방식으로
대기를 해야한다는 단점이 있습니다.
이러한 문제를 해결하기 위해 자바는 계속 발전해왔는데 다음 글에서 이어서 작성해보겠습니다.
참고한 자료
[Java] Callable, Future 및 Executors, Executor, ExecutorService, ScheduledExecutorService에 대한 이해 및 사용법
이번에는 자바5 부터 멀티 쓰레드 기반의 동시성 프로그래밍을 위해 추가된 Executor, ExecutorService, ScheduledExecutorService와 Callable, Future를 살펴보도록 하겠습니다. 1. Callable과 Future 인터페이스에 대한
mangkyu.tistory.com
'Java' 카테고리의 다른 글
| 스프링 DI의 원리, JPA Entity의 기본 생성자가 필요한 이유 (feat. Java Reflection) (0) | 2023.09.19 |
|---|---|
| 가비지 컬렉션(feat. Paralle GC, CMS GC, G1 GC) (0) | 2023.09.14 |
| 자바 쓰레드 관리의 시작 (2) | 2023.08.18 |
| 자바가 Call By Reference가 아닌 이유 (0) | 2023.08.05 |
| enum class로 상수를 관리해야하는 이유 (0) | 2023.06.22 |


